Description
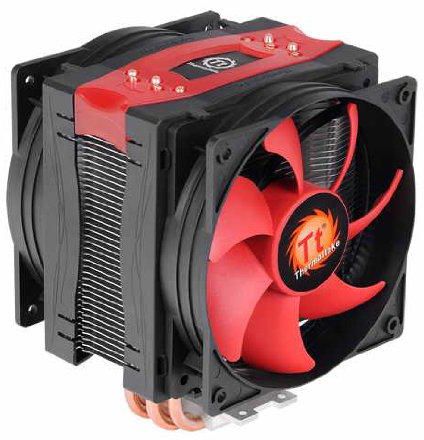
Thermaltake Frio Advanced Universal CPU Cooler with Ultimate Over-Clocking Support of 230W TDP Dual 130mm VR/PWM Fans CLP0596
Features OF Thermaltake Frio Advanced Universal CPU Cooler with Ultimate Over-Clocking Support of 230W TDP Dual 130mm VR/PWM Fans CLP0596
– Heat-pipe Direct Touch Technology, Supports 230W Cooling Performance
– Dual 13cm Over-clocking Fan, PWM controllable with 800~2,000 RPM Speed
– Universal Socket Compatibility & Accessory Package
Detailed Feature
Heat-pipe Direct Touch Technology, Supports 230W Cooling Performance
– 5 x Ø6 mm heat-pipes direct touch CPU surface increasing heat conductivity.
– High density Aluminum fins allow larger surface area to quick dissipate heat.
– Premium thermal grease maximizes heat transfer from the CPU into the cooler base for rapid dissipation.
Dual 13cm Over-clocking Fan, PWM function with 800~2,100 RPM Speed
– A pair of high performance red bladed fans generate excellent cooling power.
– Tool-less fan installation provides great convenience for users.
– Vibration-absorbent gaskets decrease noise during operation.
– Fan speed at the lowest RPM provides good performance and very low noise.
Universal Socket Compatibility & Accessory Package
– All-in-one back-plate design, offers support for all Intel and AMD platforms
– Universal socket support : Intel: LGA 2011, LGA1366, LGA1156, LGA1155, LGA775AMD: FM1, AM3+, AM3, AM2+, AM2
Dimension
Intel Motherboard Installation
| Step 1 | Step 2 |
| |
| Step One: Insert the four long screws through the back-plate into the four holes on the motherboard and secure them with the four plastic spacers. | Step Two: Put the two Intel mounting bars along the four long screws and secure them with four nuts. |
| Step 3 | Step 4 |
| |
| Step Three: Remove two fans from the cooler before installation. | Step Four: Securing the two T-mounting bars to the base of cooler by short screws. |
| Step 5 | Step 6 |
| |
| Step Five: Applying a thin layer of thermal grease | Step Six: Place the assembled heat-sink onto the CPU and tighten each fixing bolts evenly. |
| Step 7 | Step 8 |
| |
| Step Seven: Place a fan to the fan duct at a slanted angle and push the top of fan until hearing a “click” sound. Repeat steps for the other fan. | Step Eight: Connect the 4-pin wire to the motherboard’s CPU fan connector. Installation is done. |
AMD Motherboard Installation
| Step 1 | Step 2 |
| |
| Step One: Insert the four long screws through the back-plate into the four holes on the motherboard and secure them with the four plastic spacers. | Step Two: Put the two AMD mounting bars along the four long screws and secure them with the four nuts. |
| Step 3 | Step 4 |
| |
| Step Three: Remove two fans from the cooler before installation. | Step Four: Securing the two T-mounting bars to the base of cooler by short screws. |
| Step 5 | Step 6 |
| |
| Step Five: Applying a thin layer of thermal grease | Step Six: Place the assembled heat-sink onto the CPU and tighten each fixing bolts evenly. |
| Step 7 | Step 8 |
| |
| Step Seven: Place a fan to the fan duct at a slanted angle and push the top of fan until hearing a “click” sound. Repeat steps for the other fan. | Step Eight: Connect the 4-pin wire to the motherboard’s CPU fan connector. Installation is done. |
Airflow Chart


/yaootaweb-production-ae/media/crawledproductimages/8a0a9eff1f86a1b9d8cae603ec218648f0f3bb17.jpg)
/yaootaweb-production-ae/media/crawledproductimages/6ceda94c4f8fe4b240ab3e58ac8ad3e16bdae444.jpg)
/yaootaweb-production-ae/media/crawledproductimages/c57a3bf1259d17c5e065c5f9f8ddf913afd6ad40.jpg)
/yaootaweb-production-ae/media/crawledproductimages/46c6f8e4e2d40470bd534fdc0dd1eb621796c166.jpg)